Nerves is an IOT framework for the Elixir language. This post details building a sub-second real-time monitor for my home router's two internet connections. Such a high refresh rate allows for visibility of traffic down to individual page loads. All of this is presented physically with an LED and virtually using a Phoenix websockets powered UI.

Finished Product
A Raspberry Pi0w drives a shared-anode RGB LED for a basic notification of which services are online. The Pi0 is running firmware that SNMP polls my router continuously. Phoenix LiveView also runs on the Pi to provide the last three minutes of traffic as well as the last 30 status events. Both polls from the router and updates to the UI occur every 300 milliseconds. Now that is real-time!
The code for this project can be found on my Github: Router Light
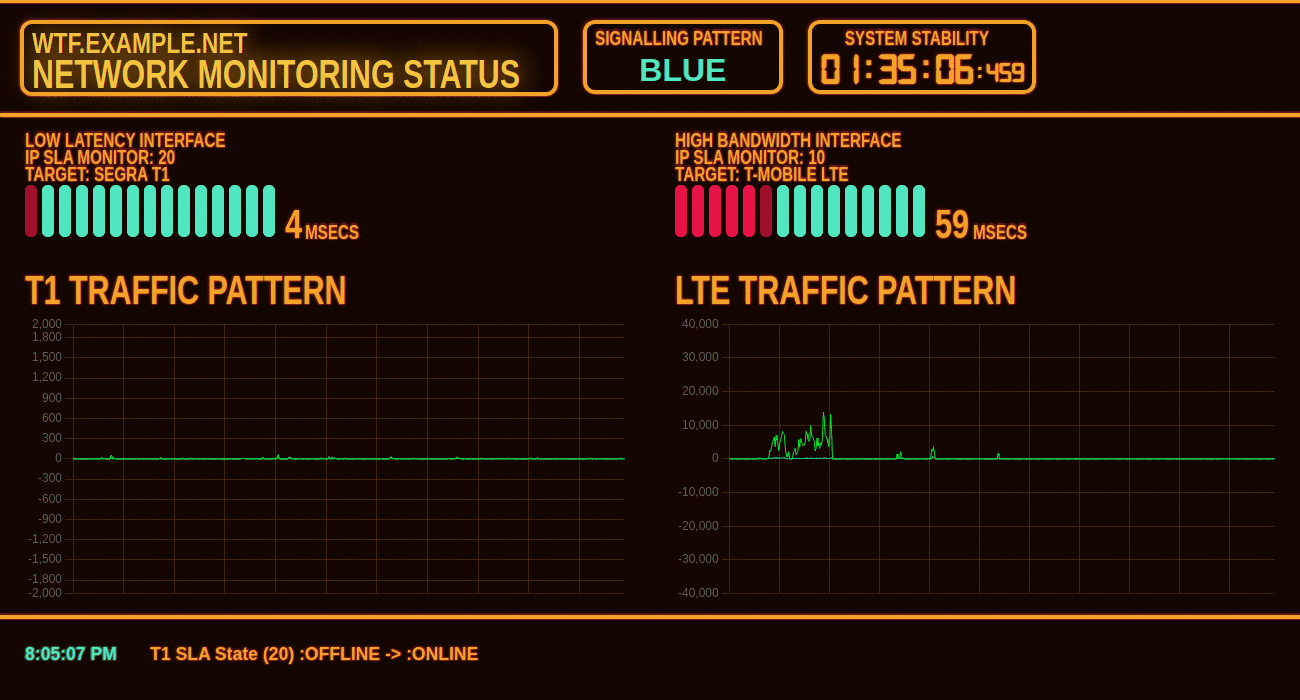
The dashboard is capable of showing traffic spikes for individual page requests while we are browsing! The graphs and logs are all built on ring-buffers that rotate in memory so the SD card isn't used for any write operations meaning this should live for a long time. This also means that the dashboard graphs always have the historical data on page load which allows for investigating hiccups several minutes prior.
Project Structure
The project is broken into two components: the firmware and the UI. Nerve recommends a "poncho" project structure that keep these two modules as independent Elixir projects so each can be developed independently. The firmware module can include the UI as a dependency when the final build occurs.
Nerves UI - NERV
NERV is the agency responsible for protecting humanity in the anime series Neon Genesis Evangelion. The show released back in 1995 and has some incredibly iconic user interfaces and typography. You can see some examples from the show here: Imgur Gallery
I decided to replicate some UI elements for this project. There's a wonderful amount of text abuse used in the show. The CSS transform property was very useful in increasing the vertical stretch of text. Fonts In Use made a wonderful article detailing the typography in the show, and it's well worth a read!
Updating the UI
I chose to use Phoenix LiveView for this project. Initially the intention was to utilize the DOM template updates Phoenix LiveView provides but this puts a lot of load on the server-managed updates. In the end I settled on using the Hooks feature of LiveView to leave most of the DOM intact and used javascript to offload all the updates to the client browsers.
Every 300 milliseconds the LiveView module queries the :Poller GenServer for
a new dashboard. It serializes the %Dashboard{} struct and sends the data
over a websocket to the javascript hook which then updates the UI. This
provides a relatively performant application.
Communication Between Firmware and UI
Right now the LiveView is directly querying the poller for new dashboards. This is relatively inefficient as the refresh interval on the UI and on the poller may not directly sync up properly. It also couples the UI directly to the Firmware which I don't like much.
Another solution down the road may utilize Phoenix's built-in PubSub
interface. This would allow the UI to subscribe to update from the
:Poller GenServer and would de-couple the two components well.
Firmware & OTP
The firmware uses processes that run on the BEAM Virtual Machine. Processes on the BEAM are much smaller and lightweight than a typical OS process. Each process is a way to store a tiny bit of state.
A GenServer is a set of interfaces for managing a process that contains state and needs to dynamically update that state over time. This is done through the use of callbacks. Additionally, GenServer processes can send messages to themselves which makes them perfect for jobs executed continuously on an interval.
OTP also provides the concept of process supervision. If any GenServer crashes (say the SNMP poller experiences an error reading a device) the supervisor will automatically restart the GenServer to a fresh state. This means that a properly structured application can be made resilient without external 'watchdog' programs or system cron-jobs and 'running lock files'.
Here is the entire SNMP Poller GenServer which is responsible for requesting a poll from the SNMP Library and generating the dashboard. The state for this GenServer consists of a struct with the current dashboard and the previous SNMP Poll data. This allows for the checks for changes in state between one poll and the next for link UP/DOWN events or SLA status changes.
defmodule RouterLightFirmware.SNMPPoller do
  use GenServer

  alias RouterLightFirmware.StatusLight
  alias RouterLightFirmware.Utilities.SNMP
  alias RouterLightFirmware.Dashboard

  defstruct last_poll: %SNMP{},
            dashboard: %Dashboard{}

  # Milliseconds
  @polling_interval 300

  ####################
  # CLIENT API
  ####################
  def start_link(_) do
    GenServer.start_link(__MODULE__, :ok, name: :Poller)
  end

  def get_dashboard(pid) do
    GenServer.call(pid, :get_dashboard)
  end

  ####################
  # CALLBACKS
  ####################
  # Initializes the GenServer and sets up the initial state
  @impl true
  def init(:ok) do
    Process.send_after(self(), :poll, @polling_interval)
    {:ok, %__MODULE__{
      last_poll: %SNMP{},
      dashboard: Dashboard.get_initial_state()
    }}
  end

  # `handle_call/3` can return some of the state on demand
  @impl true
  def handle_call(:get_dashboard, _from, state) do
    {:reply, state.dashboard, state}
  end

  # `handle_info/2` does some work and updates the new state of
  # the GenServer (within the process)
  @impl true
  def handle_info(:poll, state) do
    cur_poll = SNMP.poll_batman()

    new_dashboard =
      Dashboard.update(state.dashboard, cur_poll, state.last_poll, @polling_interval)

    # Instruct the :StatusLight GenServer to update
    StatusLight.change_color(:StatusLight, new_dashboard.status_color)

    new_state =
      state
      |> Map.put(:dashboard, new_dashboard)
      |> Map.put(:last_poll, cur_poll)

    Process.send_after(self(), :poll, @polling_interval)
    {:noreply, new_state}
  end
end
When the process is first started it immediately sets up its own state
and sends a message calling its own handle_info/2 with a :poll request.
At the end of each poll the GenServer sends a message to itself for another
:poll in 300 milliseconds. This means the GenServer will continuously update
it's state based on the results from the SNMP agent.
At any time a call can be made to this process to get the current dashboard.
Other GenServers
Another GenServer named :StatusLight initializes the GPIO pins on the target
Pi0w. It provides another type of interface for remote clients to update the
light's color using a cast. Casts allow for the update of a GenServer's state
without expecting a response back (fire-and-forget).
Processing SNMP
This project used the built-in Erlang SNMP Manager application. It is very quick, typically polling my router in under 5ms. A list of OIDs can be provided and a tuple is returned with all the data. This is easily de-referenced back into values for parsing. Pattern-matching features of Elixir convert many of the integer state values into atoms for easy parsing later.
There are more details in the README of the Firmware on how to set up Nerves to use the SNMP application. You can find the entire SNMP poller/decoder in this file: snmp.ex
A Note on Cisco IOS & SNMP
My polling target is a Cisco 1841 router. There is a hidden command on this this router that allows for very granular resolution on SNMP counters.
snmp-server hc poll 10 will force the counters to refresh in hundredths of a
second.
Burning Firmware
One of the biggest selling points of Nerves is the ease of deployment. Nerve provides a buildroot environment that generates SD card images and burns them onto the card. This means the host machine can develop and test the application and then the target image can be generated.
I was able to develop all the UI and Firmware (minus the GPIO setup) on my local linux machine. The overall PI image after burn was only 45 megs which contains a stripped down linux environment, the Erlang BEAM and my application.
In the future it is even possible to over-the-air update my remote firmware with new builds instead of swapping out the SD-Card, but I haven't used this feature yet.
By default, the Nerves image pulls in your user SSH keys for a secure authentication method to manage the IOT device. When you log in you are put directly into an IEX shell:
$ ssh iot.example.net
Interactive Elixir (1.11.2) - press Ctrl+C to exit (type h() ENTER for help)
████▄▖    ▐███
█▌  ▀▜█▙▄▖  ▐█
█▌ ▐█▄▖▝▀█▌ ▐█   N  E  R  V  E  S
█▌   ▝▀█▙▄▖ ▐█
███▌    ▀▜████

Toolshed imported. Run h(Toolshed) for more info.
RingLogger is collecting log messages from Elixir and Linux. To see the
messages, either attach the current IEx session to the logger:

  RingLogger.attach

or print the next messages in the log:

  RingLogger.next

iex(1)>
This makes debugging a breeze, for example pulling Wifi statistics:
iex(1)> VintageNet.ioctl("wlan0", :signal_poll)
{:ok,
 %VintageNetWiFi.SignalInfo{
   center_frequency1: 2462,
   center_frequency2: 0,
   frequency: 0,
   linkspeed: 72,
   signal_dbm: -22,
   signal_percent: 99,
   width: "20 MHz"
 }}
Final Notes
This was a fun project. I encourage everyone interested in IoT to take a look at the Nerves project and experiment with the wonderful features that the BEAM and Erlang/OTP can provide for you. I believe it's a perfect fit for these new edge applications.